How to Clean Burr Grinder for Better Coffee
A great bag of freshly roasted coffee can lose its sparkle before it reaches your cup if yesterday's grounds are still hiding in your grinder. Learning how to clean burr grinder components properly is one of the simplest ways to protect the sweetness, clarity, and aroma you chose those beans for. It takes only a few minutes, and the difference can be especially noticeable with delicate single-origin coffees.
Coffee grounds leave behind more than visible particles. Natural oils cling to the burrs, chute, and grounds bin, then slowly go stale. Over time, that buildup can make a bright coffee taste muted, add bitterness to a comforting morning cup, and affect how consistently your grinder delivers each dose.
Why a Clean Burr Grinder Makes Coffee Taste Better
Burr grinders earn their place on the counter because they create more even particles than blade grinders. Even grinding helps water extract coffee more evenly, whether you are brewing a pour-over, French press, drip coffee, or espresso. But burrs cannot do their best work when old grounds and oils fill the spaces around them.
The problem is often subtle at first. A coffee that usually tastes like chocolate and caramel may seem flat. A floral, fruit-forward roast may lose its clean finish. If your espresso suddenly runs slower or faster without an obvious change to your recipe, retained grounds and compacted coffee dust may be part of the reason.
Cleaning is not about chasing perfection every day. It is about giving fresh, carefully roasted beans a fair chance to express their character. For a coffee ritual that brings people together at home, those small details matter.
How to Clean Burr Grinder Step by Step
Always start by unplugging an electric grinder. If you use a manual grinder, empty it completely and place it on a clean, dry towel. Check your grinder's manual before removing burrs, particularly if it has calibration markings, screws, or a stepped adjustment system.
1. Empty the hopper and clear loose grounds
Remove any beans from the hopper. You can grind the remaining beans through at a coarse setting, then tap out loose grounds from the hopper and grounds bin. A few beans may remain near the burrs, so turn the grinder upside down only if your manufacturer's instructions allow it.
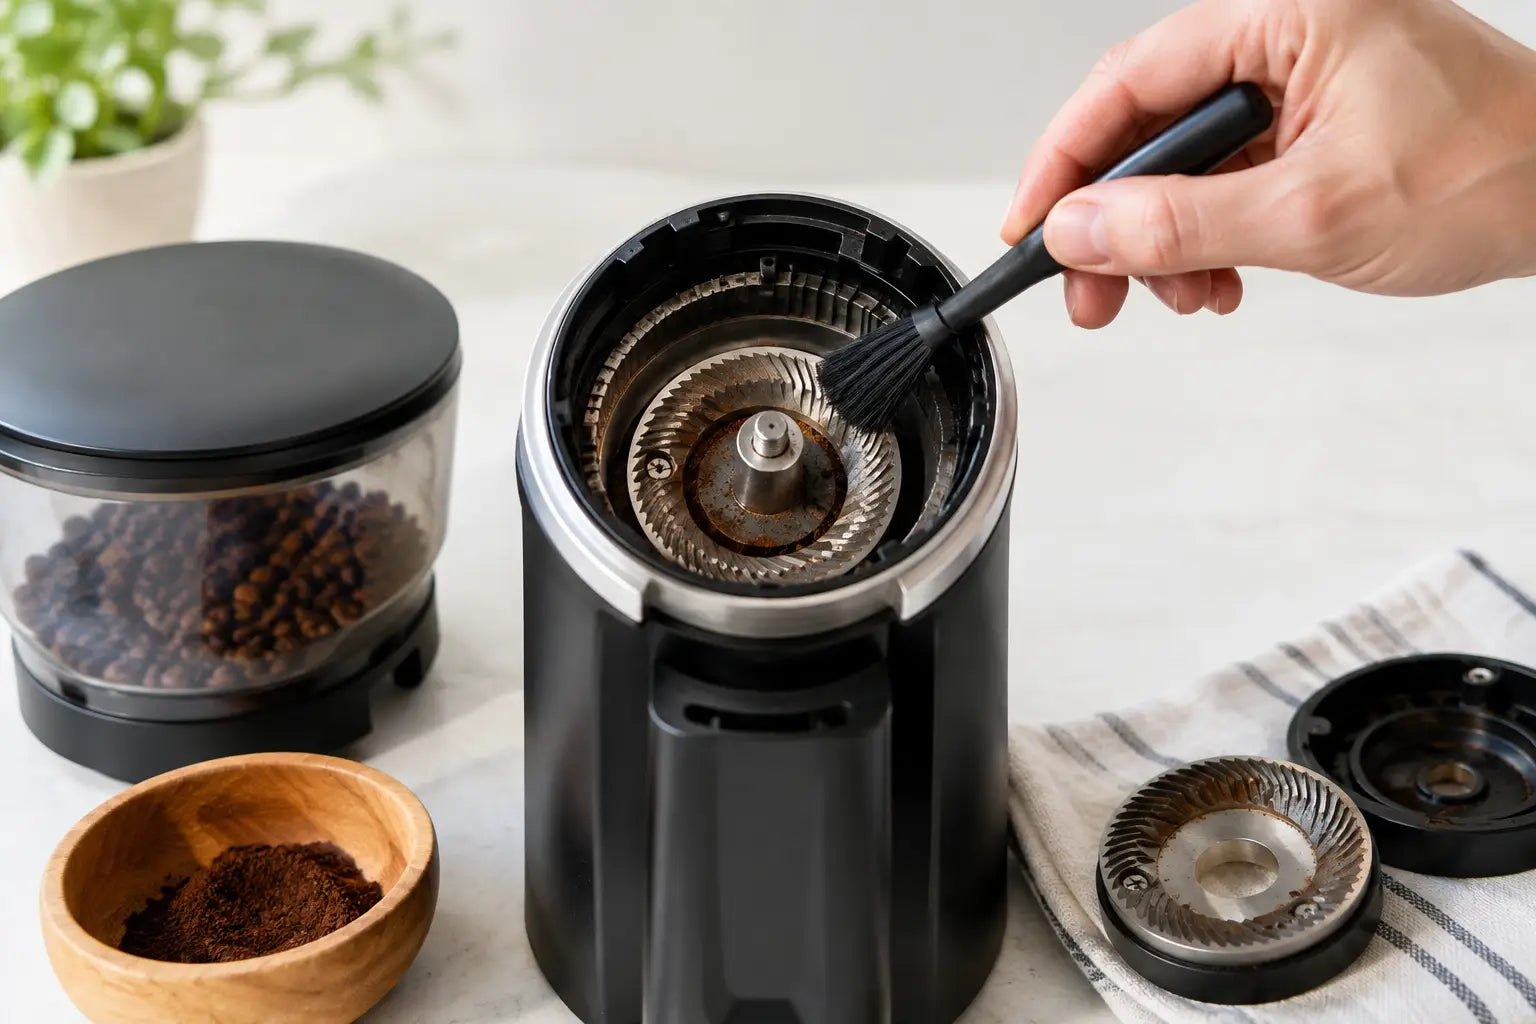
For day-to-day care, use a soft grinder brush to sweep out the burr chamber and exit chute. A small, dry pastry brush can work in a pinch, but choose one that is clean and reserved for coffee equipment. Never use a damp brush inside the grinder.
2. Remove the upper burr, if your grinder allows it
Many home burr grinders let you lift or twist out the upper burr without tools. This gives you access to the places where fine coffee particles collect. Take a quick photo before you begin if the burr orientation is not obvious. That makes reassembly easier and helps preserve your usual grind setting.
Use the brush to clean both burr surfaces, the surrounding chamber, and the path leading toward the grounds chute. A wooden toothpick can gently dislodge packed grounds from tight corners. Work patiently rather than scraping aggressively, since burr edges and internal plastic pieces can be damaged.
Do not remove the lower burr unless the manufacturer specifically recommends it and you are comfortable recalibrating the grinder. On many models, a thorough upper-burr cleaning is enough for routine maintenance.
3. Clean removable non-electrical parts separately
The hopper, lid, and grounds bin can often be washed with warm water and a small amount of mild dish soap. Check the manual first, as some plastic parts are not dishwasher-safe and certain hoppers should only be wiped clean.
Rinse away all soap residue and let every piece air-dry completely before putting it back. Moisture and coffee grounds are a poor combination. Even a small amount of water inside the burr chamber can cause grounds to clump, affect performance, or encourage corrosion on metal parts.
4. Reassemble, then purge the grinder
Once everything is dry, reinstall the burr and hopper according to your grinder's instructions. Set the grinder to a medium or coarse setting before turning it on, especially after removing burrs. Then grind a small amount of coffee and discard it. This purge clears any loosened particles and confirms that the grinder is running smoothly.
If you are switching from a dark, oily roast to a light, crisp single origin, consider purging a little more. Dark roasts tend to leave more oil behind, and a small sacrificial dose helps keep flavors distinct.
What Not to Use When Cleaning a Grinder
Water is useful only for removable parts that are designed to be washed. Never rinse the burr chamber, motor housing, or burrs under running water. Avoid spraying cleaning solutions into the grinder, too. They can leave residue and introduce moisture where it does not belong.
Rice is another common suggestion, but it is not a universal solution. Uncooked rice can be too hard for some home grinders and may stress burrs or motors. If you want a cleaning aid beyond brushing, use grinder-cleaning tablets made specifically for coffee equipment and only when your manufacturer says they are compatible.
Avoid using compressed air indoors unless you are prepared for a cloud of coffee dust. It can push fine particles deeper into the machine instead of removing them. A brush and a vacuum used near, not inside, the burr chamber are usually the calmer, more reliable option.
How Often Should You Clean a Burr Grinder?
Your ideal schedule depends on how much coffee you make and what you brew. If you grind daily, brush out the hopper and grounds area every week or two. A deeper clean that includes removing the upper burr is a good monthly habit for most households.
Clean more frequently if you use oily dark-roast beans, change coffees often, or brew espresso. Espresso grinders are sensitive to small changes in dose and particle flow, so retained grounds can quickly affect your shots. For occasional drip coffee drinkers, a deep clean every six to eight weeks may be enough.
A few signs tell you it is time sooner: grounds are clinging to the chute, your grinder sounds strained, your dose is less consistent, or your coffee tastes unexpectedly dull or bitter. Trust your senses. The aroma inside the burr chamber should smell like coffee, not like old oil.
Keep Your Grinder Cleaner Between Deep Cleans
The easiest maintenance routine is also the gentlest. Store beans in an airtight container rather than leaving a full hopper exposed for days. Add only the amount you plan to grind when possible. This protects freshness and limits the oils that settle inside the grinder.
After grinding, give the machine a light tap and brush away any grounds around the chute and bin. If static creates a mess, a tiny mist of water on whole beans before grinding can help, but use only one very light spray and never add water directly to the grinder. This technique is best for experienced home brewers who understand their grinder's behavior.
If your grinder offers a removable grounds bin, wash and dry it regularly. Coffee residue on the bin may not change the grind itself, but it can affect the clean, inviting experience of preparing a cup for yourself or someone you love.
A Fresh Start for Every Bag of Coffee
A clean grinder is especially worthwhile when opening a new coffee. Take a moment to brush out the old grounds before tasting a different origin, roast level, or processing style. You will get a more honest first impression of the new beans, from the fragrance that fills the kitchen to the final sip.
Treat the task as part of the craft, not a chore. A few quiet minutes of care can help turn a regular brew into the kind of warm, clear, flavorful cup that makes home feel like the best place to be.